

Last Updated: November 4, 2026
Quick Summary
Acrylic tiered stands for organizing nail polish work best when you match shelf depth, tier gap and usable width to your tallest and widest bottles before ordering. Most mistakes come from counting capacity on the bottom tier only, overloading a narrow base, and skipping a loaded stability test.
- Sort by one primary method, such as color, brand or use, then use tiers as a secondary layer.
- Divide each shelf's usable width by your widest bottle base and round down for a realistic count.
- Our tiered shelf organizer has a fixed step depth of 2.36 inches (60 mm), with width and tier count you choose.
- Keep heaviest bottles on the bottom tier and test the stand fully loaded before trusting it on a high surface.
- Dust with a soft dry cloth and wipe with mild soapy water, avoiding paper towels and harsh solvents.
Table of Contents
- Why Acrylic Tiered Stands Beat a Drawer Full of Bottles
- How to Organize Nail Polish Bottles by Color, Brand and Use
- Nail Polish Stand Capacity: Counting Bottles Before You Buy
- What a Clear Acrylic Nail Polish Rack Actually Shows You
- Picking an Acrylic Nail Polish Riser That Fits Your Bottles
- Stability, Load and Tipping Risk on a Fully Loaded Stand
- Cleaning, Scratches and Keeping Acrylic Clear for Years
- Measure Your Shelf Space Before You Order a Tiered Stand
- Frequently Asked Questions
Why Acrylic Tiered Stands Beat a Drawer Full of Bottles
A drawer full of nail polish hides the one thing you need most: the color itself. You open it, dig through a jumble of glass, and pull out five bottles before finding the shade you pictured. Acrylic tiered stands for organizing nail polish solve that by putting every bottle in view at once. This guide covers the common mistakes that wreck a good stand, and how to avoid each one.
The core appeal is simple. A clear, stepped riser lifts each row above the one in front, so labels and colors stay visible from above. Nothing gets buried. You see the whole collection in a single glance.
Where many buyers go wrong is treating a stand like a generic storage box. Fit, tier count, bottle size and stability all decide whether a stand works well over time. Below, we walk through each mistake, plus a practical checklist you can use before you order.
How to Organize Nail Polish Bottles by Color, Brand and Use
The best way to organize nail polish bottles is to sort by the method you actually reach for first. Most people sort by color, but that only works if color is how you choose. If you buy by brand or by season, sort that way instead.
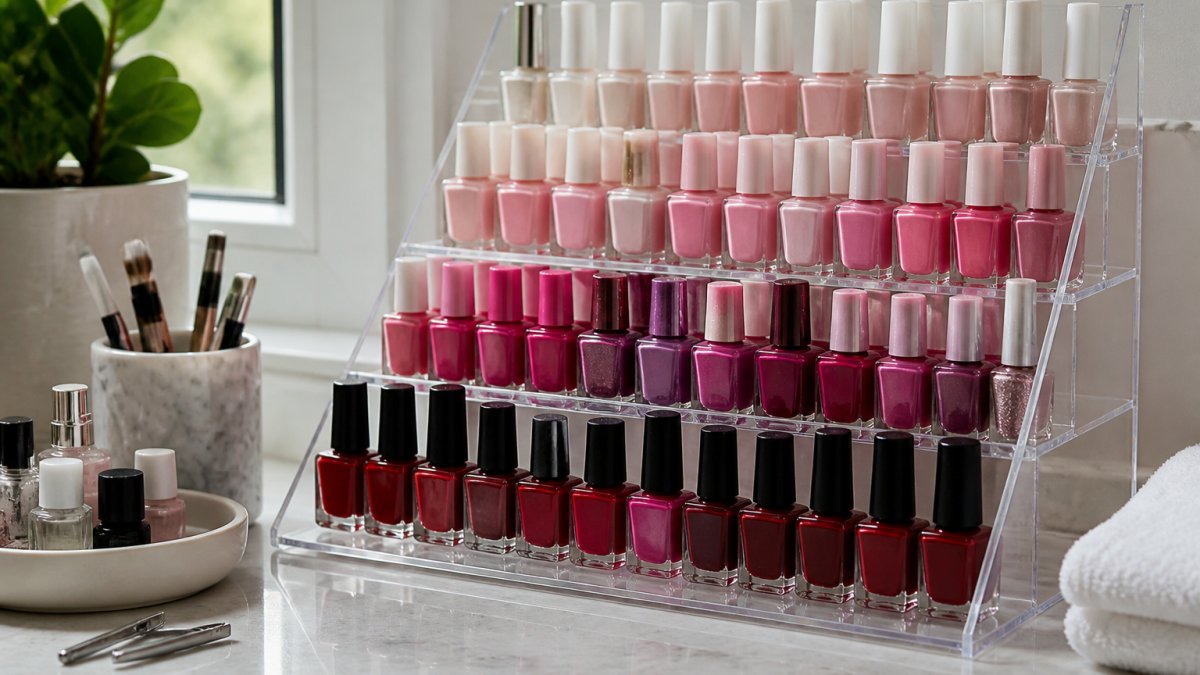
Three sorting methods cover almost everyone:
- By color: Line up a gradient from light to dark across each tier. Fastest for people who pick a shade first.
- By brand: Group each label together. Best when you own several bottles from the same line and want them side by side.
- By use: Separate everyday shades from special-occasion ones, or base coats and top coats from color.
A common mistake is mixing all three at once. Pick one primary sort, then use tiers as a secondary layer. For example, sort by color across the stand, but keep your top coats on the top tier.
Nail Polish Stand Capacity: Counting Bottles Before You Buy
Nail polish stand capacity is the number of bottles a stand holds when every tier is full, and it depends on four things: tier count, usable shelf width, usable shelf depth, and the footprint of your actual bottles. A stand that looks roomy in a photo can hold far fewer bottles than you expect once real bottles sit on it, because headline capacity claims usually assume slim, round, standard-size bottles.
Count before you buy with a realistic method rather than a marketing number. Measure your widest bottle across its base, then divide each shelf's usable width by that number and round down. Multiply by the number of tiers.
A standardized way to compare stands side by side is to record the same key figures for every option you consider:
| What to Compare | Why It Changes Capacity | What to Record |
|---|---|---|
| Tier count | More tiers add rows but also height | 2, 3, or 4 tiers |
| Usable shelf width | Sets bottles per row | Flat span in inches or mm |
| Usable shelf depth | Must clear the bottle base front-to-back | Front-to-back room per step |
| Tier gap height | Tall bottles may not fit under the step above | Vertical clearance between steps |
Bottle shape matters as much as diameter. Wide square caps and chunky gel bottles take more room than slim round ones, and a stand sized for standard bottles may hold fewer than planned once those wider shapes are in the mix.
A common pattern is that buyers count bottles on the bottom tier only and assume the upper tiers hold the same. They often hold fewer, because the step above cuts into usable depth and height. Count each tier separately if your bottles vary in size.
For a worked example of planning tier counts around a collection, the guide to tiered shelves for deck collections walks through the same math.
What a Clear Acrylic Nail Polish Rack Actually Shows You
A clear acrylic nail polish rack shows color, label and fill level through the material itself, which is why transparency matters more than any other finish. Opaque wood or metal hides the bottles behind a wall. Clear acrylic lets light pass through, so every row reads at a glance.
That transparency does two jobs. First, it makes the stand feel lighter in a small bathroom or on a crowded vanity. Second, it lets you spot an empty or nearly finished bottle without lifting it.
The trade-off is honesty: clear material shows scratches and dust. We cover care below, but the point here is that a clear rack rewards a little upkeep with a display that looks sharp. For a collection you want to see rather than store, transparency is worth it.
Picking an Acrylic Nail Polish Riser That Fits Your Bottles
An acrylic nail polish riser only works if its shelf depth matches your bottles. Depth, not width, is the measurement most buyers skip, and it causes the most disappointment. A bottle that overhangs the front edge can slide off; one that is too tall for the gap between tiers will not fit at all.
Tiered Shelf Stand Organizer for Spices | Custom Width Riser | Nail Polish →
Check three measurements against your tallest and widest bottles:
- Shelf depth: front-to-back room on each step.
- Tier height: the vertical gap between one step and the next.
- Usable width: the flat span you can actually fill.
Our own tiered shelf organizer uses a fixed step depth of 2.36 inches (60 mm), which suits standard polish, hobby paint and cosmetic bottles. You choose the width and tier count to match your space, and the riser arrives in black or white. That approach works because depth stays consistent while width flexes to your shelf.
Stability, Load and Tipping Risk on a Fully Loaded Stand
Stability is the mistake that gets overlooked until a full stand shifts. A tiered riser loaded with glass bottles carries real weight, and a narrow base or a top-heavy stack makes tipping more likely.
Load the stand deliberately. Keep the heaviest bottles on the bottom tier and lighter ones up top, and spread weight evenly across each shelf rather than clustering it at one end. If you use a modular or multi-piece stand, load the sections evenly so one side does not carry more than the other.
Watch out: a stand perched at the front edge of a high shelf can tip more easily. Push it back so the base sits fully supported, and check that no bottle overhangs the front edge.
A few habits reduce tipping risk on a fully loaded stand:
- Set your shelf on a level, non-slip surface rather than the edge of a counter or a sloped vanity.
- Keep the tallest, lightest bottles toward the back of each tier, not the front edge.
- Recheck balance after adding a new row of bottles or moving the shelf to a new spot.
- Avoid stacking a second stand on top of a loaded one; add tiers or width instead.
If you store heavy or fragile collections and want deeper guidance on load and safe stacking, see how to store heavy card collections safely. The same principle applies to your shelf: distribute weight low and even, and let the base carry the load rather than a top-heavy stack.
Cleaning, Scratches and Keeping Acrylic Clear for Years
Acrylic stays clearer longer if you clean it gently. Dust with a soft, dry cloth, then wipe with mild soapy water and a microfiber cloth. Avoid paper towels, abrasive pads and harsh solvents, which dull the surface and leave fine scratches that cloud the material.
A few habits protect the finish:
- Wipe spills promptly; dried polish remover can mark acrylic.
- Keep the stand out of direct, hot sunlight to reduce warping risk over time.
- Lift bottles rather than dragging them across the steps.
A light scratch on clear acrylic is normal with daily use. Gentle cleaning keeps it from building up, and a stand treated this way holds its clarity far longer than one scrubbed with harsh cleaners.
Measure Your Shelf Space Before You Order a Tiered Stand
Measure first, order second. Measuring first helps you avoid a poor fit. Grab a tape measure and note four figures: the width of the spot, its depth, the height clearance above it, and the diameter of your widest bottle.
| What to Measure | Why It Matters | What to Record |
|---|---|---|
| Available width | Decides how many bottles fit per tier | Flat span in inches or mm |
| Available depth | Must clear the stand's total depth | Front-to-back space |
| Height clearance | Keeps top tier reachable and clear | Gap above the shelf |
| Widest bottle | Sets realistic bottle capacity | Base diameter |
| Tallest bottle | Must fit the tier gap | Bottle height |
Then match those numbers to a stand's specs. Our tiered shelf organizer can be built to your exact width in 2, 3 or 4 tiers, so you can fit a narrow counter or a wide cabinet. When you are ready to talk sizing and made-to-order setups for your collection, contact our team with your measurements.
Frequently Asked Questions
How many nail polish bottles fit on an acrylic stand?
It depends on tier count and shelf width, not on a single headline number. A tiered stand holds one row of bottles per step, so capacity equals the number of tiers multiplied by how many bottles fit across your chosen width. Measure your widest bottle first, then divide the shelf width by that figure and round down. Leave a small gap between bottles so you can lift each one out without knocking its neighbour.
Are acrylic tiered stands stable when fully loaded?
A self-standing tiered stand is stable when the base is wider than the loaded shelves above it and the weight sits low. Load the bottom tier first with your heaviest bottles, keep the top tier for lighter or shorter ones, and set the stand on a flat, level surface rather than a towel or mat. Avoid stacking a tall stand on a narrow ledge where a bumped elbow can send it over.
Can a clear acrylic nail polish rack hold different bottle sizes?
Yes, within limits. Bottles sit on a flat step, but the step depth decides what fits front to back. Check the depth of each step against your tallest bottle base, and check the height gap between tiers against your tallest cap. Very wide or square bottles may need a wider stand rather than a taller one.
How do you keep nail polish bottles from falling off a display stand?
Place bottles toward the back of each step rather than the front edge, and avoid overhanging bases that stick out past the shelf lip. Group similar heights together so tall bottles do not lean on short ones. If your stand sits in a high-traffic spot, keep the top tier for bottles you rarely reach for and the lower tiers for daily colours, which reduces the number of times you reach over the front row.
A stand that fits your bottles and your space turns a cluttered drawer into a display you actually enjoy. At The Card Shelf Workshop, we build 3D-printed tiered stands with custom widths, 2 to 4 tier options, and a choice of black or white, so your polish, paints or decks get a shelf made to measure. Get started with The Card Shelf Workshop and give your collection a clear, organized home.
